

ARIE Native
For ARIE Native, each document will get filed as one document without getting split in any way.
ARIE uses the content it sees on the first page to file the document according to your Native distribution rules.
Always test new rules with a few documents before filing several at once, just to be sure everything is going where it should.
From the menu on the left-side of the screen, click Admin, then click Distribution Rules under the column: ARIE Management.
Add ARIE Native Distribution Rule
- Click the Add Distribution Rule button.
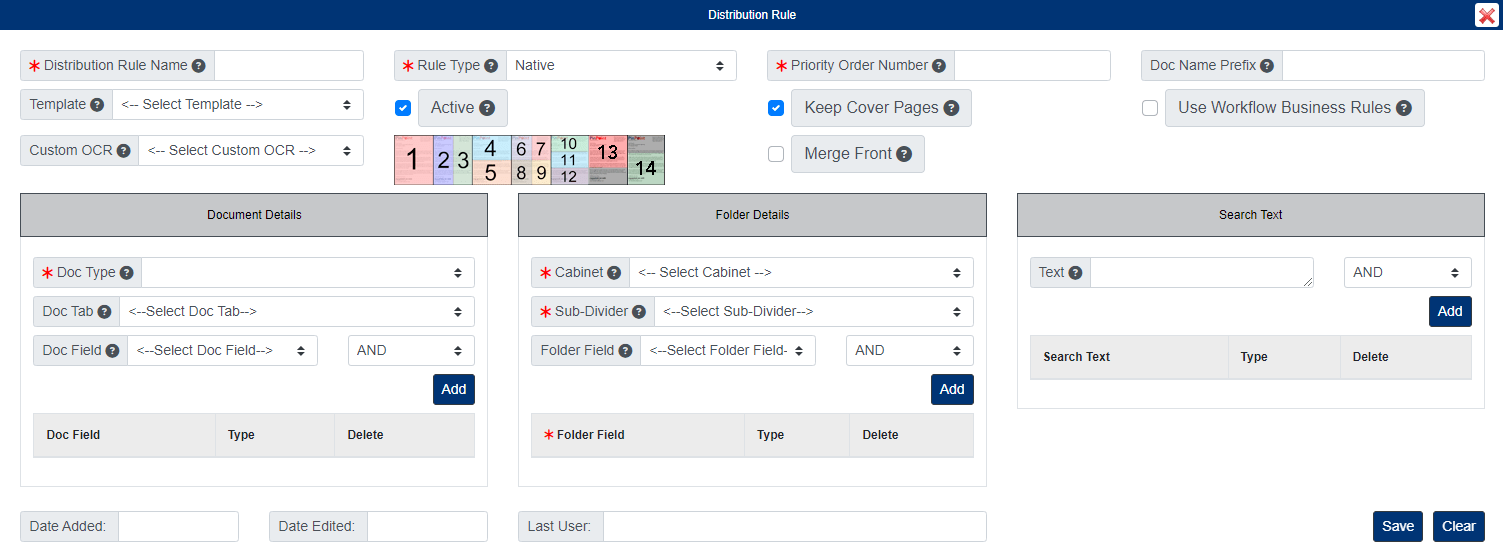
- Enter the Distribution Rule Name. Just a simple name so you know what the rule applies to.
- Select the “Native” Rule Type.
- Enter the Priority Order Number. This is the sequence order ARIE uses when trying to file documents through your Native distribution rules. For the most part, you can just keep going in a normal sequence (1, 2, 3, 4, 5), but it is recommended to put your more specific rules with more qualifications that need to be met first, to rule those in or out right away.
- If you would like to include a Doc Name Prefix for the documents, you have the option of entering one per rule.
- If you want to include a Template (zonal capture) with your ARIE Native rule, you have the option of selecting one per rule.
- By default, the box Active box will be checked. Only uncheck this box if you do not want the rule to be used.
- By default, the box will be checked to Keep Cover Pages. Keep this checked.
- If you want ARIE to use your Workflow Business Rules, check the Use Workflow Business Rules box.
- When ARIE is trying to file a document through a distribution rule, it is scanning the content on the first page of the document. By choosing the Custom OCR, you are saying where on the first page ARIE is looking for content to file the document. For example, if you chose #4, then ARIE would only be looking for content in the top-half of the first page.
- Under Document Details, select the Doc Type you want documents filed as.
- Doc Field: If you would like ARIE to automatically merge new documents to existing documents that contain the same metadata, you can select which metadata field(s) ARIE will use for the document merge. If you want documents to be filed into PinPoint as new documents, you should not use this feature.
- Under Folder Details, select the Cabinet and Sub-Divider you want documents file to. If you select an Exclusive Sub-Divider for your rule, be sure to use the Link to Folder function add link the folder that the exclusive sub-divider is assigned to.
- Add at least one Folder Field. The folder field you choose is what ARIE will look for on the first page of a document to indicate the folder it should go into. You can add more than one folder field using AND/OR logic, as well.
- Under Search Text, enter a word or phrase that exists on the first page of the document that will help ARIE match the document to a distribution rule. You can add multiple Search Text words/phrases using AND/OR logic, as well.
- Once you are finished, click Save.
Copy ARIE Single Distribution Rule
When you copy a distribution rule, everything except for the Rule Name and Priority will be different. After making your copy, you must update the Priority number, so the rule is used.
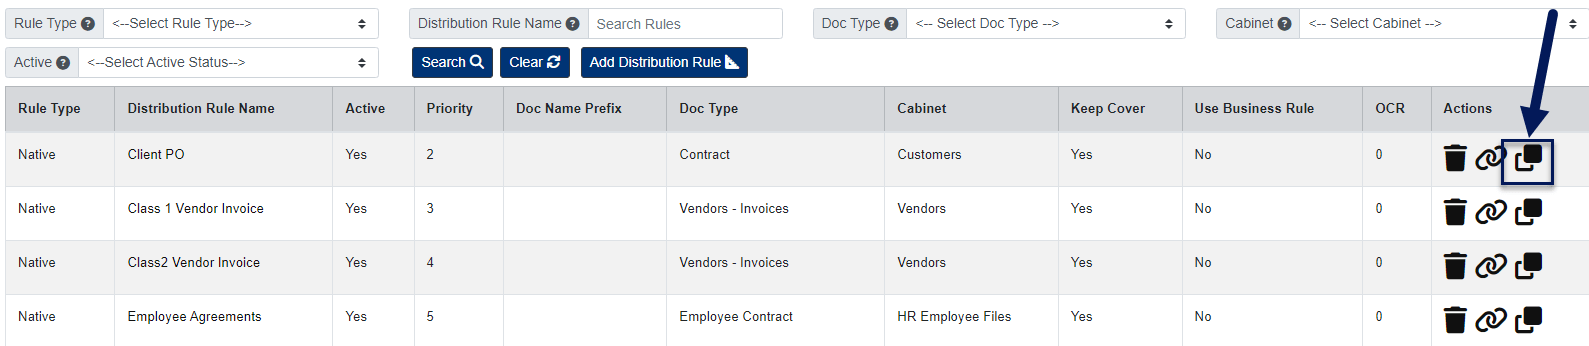
- To copy an ARIE Native distribution rule, click the Copy button under the Actions column.
- Enter the Distribution Rule Name, then click the Add button.
- After you add the new rule, click the Distribution Rule Name. The new rule will be at the top of the priority list with the number “0”.
- In the pop-up window, update the Priority Order Number.
- Make any additional changes needed, then click the Save button when finished.
Link ARIE Native Distribution Rule to Folders
Linking folders to rules means that when ARIE is attempting to file documents using the rule, ARIE will only use the folders linked to the rule for filing the documents.
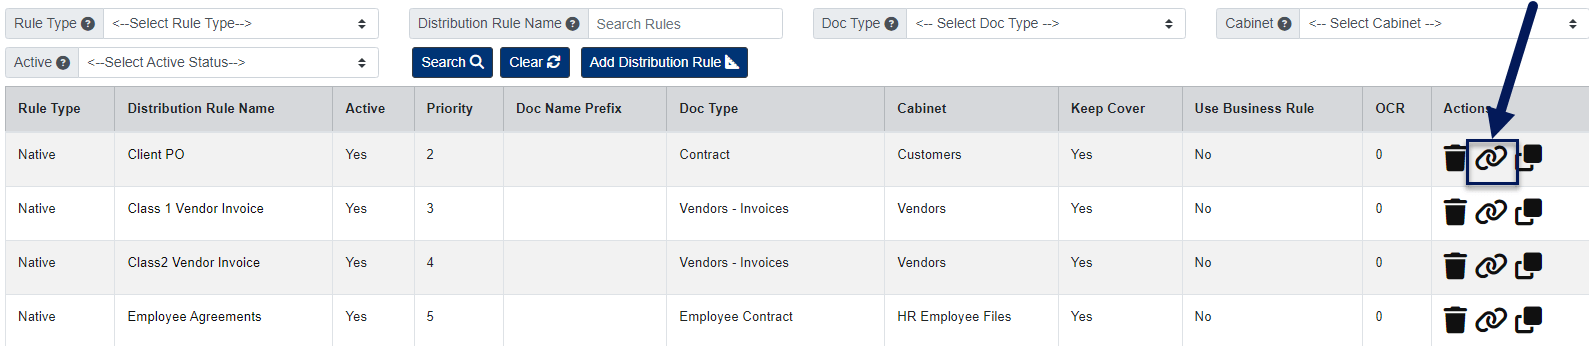
- To link folders to an ARIE Native distribution rule, click the Link to Folder button under the Actions column.
- In the pop-up window, search for the folders you would like to link to the rule, then click the + next to folder to add.
- Close the window when you are finished.
Edit ARIE Native Distribution Rule
To edit an ARIE Native distribution rule, click the Distribution Rule Name from the list of rules to open.
When finished making your changes, be sure to click the Save button.
Delete ARIE Native Distribution Rule
To delete an ARIE Native distribution rule, click the Delete button under the Actions column.