FX Action Menu
The Fx action menu provides various actions related to the document (or group of documents), provided you have been granted access to that particular action.
The following guide will go over the different functions in the Fx action menu (please keep in mind that actions will vary based on the page you are on within PinPoint).
Add New Document

This action sends users to the File Single screen for them to quickly import/scan a new document into the system.
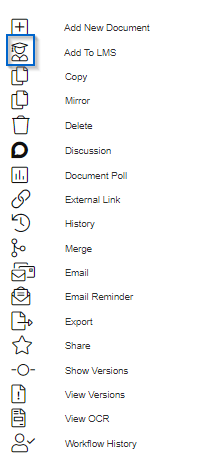
Add to LMS
This action allows you to add a document to a course as training material.
- Click the Fx button next to the document you want to assign to a course.
- Click the icon next to Add to LMS.
- Select the course, then click Assign.
ARIE Request

This action will send a request to ARIE to accomplish one of several different tasks. You would use this function to process a viewable image request, process an OCR request or process an ARIE Single, Native, or Multiple request, among other things.
- Click the Fx button next to the document you want to put in an ARIE Request for.
- Click the icon next to ARIE Request.
- Select the ARIE Process you want to request.
- Click Submit.
Change Bridge
This action gives users the ability to change the active bridge connector for the document.
- Click the Fx button next to the document you want to change the bridge connector for.
- Click the icon to the left of Change Bridge.
- Select the Bridge.
- Input the Bridge Value.
- Click Submit.
Change Doc Date (only found in Group Fx menu)
This action will change the document date for the selected document(s).
- Select the document(s) you want to change the Doc Date for.
- Click the Fx button above the Action checkbox, then click the icon next to Change Doc Date and click Yes to confirm.
- In the pop-up, select the new Doc Date and Save.
Change Doc Type
This action will change the document type and/or document tab for the document.
- Click the Fx button next to the document you want to change the doc type/doc tab for.
- Click the icon next to Change Doc Type, then click Yes to confirm.
- Select the new Doc Type/Doc Tab.
- Input any required Metadata.
- Click Save.
Check-Out
Checking out a document freezes the document in PinPoint while a user is reviewing or making changes to the document outside of the system. If you check a document out, it will download to your workstation and will then “lock” the document so other users cannot make any changes to it until you have checked it back in. The document can still be viewed in PinPoint while it is checked out by another user.
When you are ready to check a document back in, locate the document under Checked-Out Documents on your Dashboard:
- Open the document by clicking the name or the DocID.
- Click the Fx icon next to the document you want to check-in.
- From the Fx action menu, click the icon to the left of Check-In.
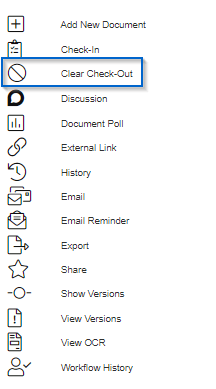
Clear Check-Out (only when a document is currently checked-out)
To clear a Check-out for a document, begin by locating the document on the Locating screen you prefer, then use the FX action menu and select Clear Check-out.
If given permission, users can clear a check-out even if they are not the user that checked the document out. To clear a check-out on a document in which you did not check-out, use the Content Search screen. Using the document “Status” as a filter, select Checked-out, then Search. You can then use the Fx action menu and select Clear Check-out.
Move
Users can move a document or a group of documents from one location to another, whether you are moving it to another cabinet, folder and/or sub-divider.
- Click the Fx button next to the document you want to move.
- Click the icon to the left of Move.
- Click Yes to confirm.
- Select the Cabinet.
- Input the folder information if you need to create a new folder on the fly, otherwise click Search to select an existing folder in the selected cabinet.
- Select the Sub-Divider.
- Click Save when finished.
Copy
This action will create a duplicate document in the same location.
- Click the Fx button next to the document you want to copy.
- Click the icon to the left of Copy.
- Click Yes to confirm.
- After the copy is made, the new document can either stay in the same location, or can be moved to another location.
Mirror
Mirroring a document allows you to save the same document in multiple locations.
- Go to Locating > Content Search
- Locate the document you want to mirror, then click the Fx button next to that document.
- From the Fx menu, click the icon next to Mirror.
- A pop-up window will appear…
- Select the Cabinet, Folder, Sub-Divider, Doc Type/Tab.
- Enter the Doc Name.
- Click Save. The “mirrored” document will then appear at the top of the document list at the Content Search page.
Delete
This action will “logically” remove the document from the cabinet/folder/sub-divider it is in.
- Click the Fx button next to the document you want to delete.
- Click the icon to the left of Delete.
- Click Yes to confirm.
- All logically deleted documents get stored in the Document Recovery screen to be officially purged from the database or recovered back to the original folder.
Discussion
Users can add and view document comments in two different ways.
- Using any locating screen, click the Fx icon next to the document, then click on icon to the left of Discussion.
- With a document open, comments are located under the Discussion section on the bottom left-hand side of the screen under the Document Settings.
Document Poll
This function allows you to create a poll for the document then assign it to users for voting.
- Click the Fx button next to the document you want to create a poll for.
- From the Fx menu, click the icon to the left of Document Poll.
- Select the Groups and/or Users you want to assign the poll to.
- Enter the Question/Topic.
- Enter Option 1 and Option 2 (Options 3-5 are optional).
- Select the Vote Limit.
- Click Submit.
Poll Requests
When a user is assigned a document poll, they will get a notification in the top right corner of PinPoint. Clicking the notification will send the user to the My Polls page where they can submit their vote. Additionally, users can access the My Polls page by going to Locating > My Polls in the user menu on the side of PinPoint.
To submit a vote, there will be a poll button under the Poll Topic column on the My Polls page.
External Link
This action provides the external link to the document. The link can be used in any browser, and can be sent to anyone you need to view that particular file. The link allows recipients to only view, share or print the document.
- Click the Fx button next to the document you want to get the external link for.
- The external link can then be Copied at the top of the screen.
Finalize
Finalizing a document means it can no longer be modified by any user in any way.
- Click the Fx button next to the document you want to finalize.
- Click the icon to the left of Finalize.
- Click Yes to confirm.
Hold
To place a “Hold” on a document means you are restricting all other users from modifying the document until the “Hold” is lifted.
- Click the Fx button next to the document you want to put on hold.
- Click the icon to the left of Hold.
- Click Yes to confirm.
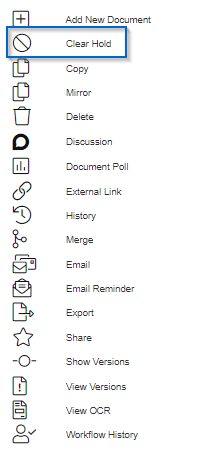
Clear Hold (only when the document is currently on hold)
To clear a Hold, the user who placed the document on hold can use the Fx action menu to clear the hold on any single document (Use the multiple Fx action menu if you are trying to clear the Hold on multiple documents at once).
If given permission, users can clear the hold on documents even if they are not the user that placed the hold. To clear a hold on a document in which you did not place the hold, use the Content Search screen. Using the document “Status” as a filter, use the drop-down menu to select “On Hold.” You can then select the document(s) and use the Multi FX action menu to “Clear Hold.”
History
This action will display the complete document life-cycle, showing all activity for the document.
- Click the Fx button next to the document you want to view the history for.
- Click the icon to the left of History.
Launch (only when you have the desktop application enabled)
If you have the PinPoint desktop application installed and would like to launch a document from the browser application to the desktop application, follow the steps below:
- Click the Fx button next to the document you want to launch to the desktop application.
- Click the icon to the left of Launch.
- In the pop-up window, click to Download, then log into the desktop application and click the Upload button on the home page.
Manage Folders
This action sends users directly to the Manage Folders screen.
Merge
This action allows users to merge multiple documents into one single document.
- To merge multiple documents into one, first find the group of documents that you’d like to merge using any search screen.
- Click the Fx icon above the search grid.
- From the Fx action menu, click the icon to the left of Merge.
- Confirm your documents are in the order you’d like them in, then click Submit.
- In the pop-up window….
- select the Cabinet, Folder and Sub-Divider the merged document will get filed to.
- Select the Doc Type and Doc Tab for the merged document.
- If you check the Delete Source Files box, the system will delete the original documents used in the merge. Not checking Delete Source Files will keep the original documents in the same location they were in after the merge is completed.
- If you check the Table of Contents box, a table of contents will be included with the merged document.
- If you check the Cover Page box, a cover page will be included with the merged document.
- If you check the Edition box, you will be creating editions of the selected documents, rather than merging them into one document. An edition is a copy of a document, though when one is updated, all editions of the document are updated with it.
- When you are finished, click Save and the new merged document will begin to get processed by ARIE in the back-end.
This action allows users to send document attachments or external links directly from PinPoint.
- Click the Fx button next to the document you want to email.
- Click the icon to the left of Email.
- A pop-up window will appear where you select how you want the document emailed:
- Viewable PDF
- Native (original copy)
- Viewable PDF and Native
- External Link
- If you would like to Encrypt And Zip ALL before sending, check the box, then input the encryption Password.
- Click Send when ready.
- You are then required to input the To, Subject and Body for your email.
- Click Send when finished.
Email Reminder
This action allows users to send an automatic document reminder via email based on a specific frequency you set.
- Click the Fx button next to the document you want to set a document reminder for.
- Click the icon next to Email Reminder.
- A pop-up window will appear…
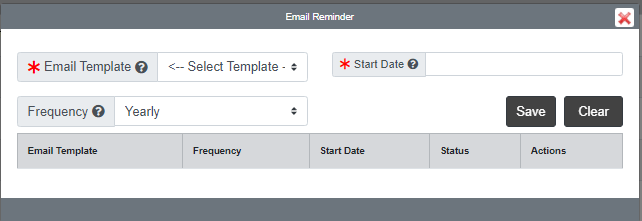
- Select the Email Template that will be sent. Click Here to access the manual page for Email Templates.
- Enter the Start Date.
- Select the Frequency for the Email Reminder.
- Click the Save button when you are finished.
After saving an Email Reminder, you can edit the reminder any time by clicking the Email Template name.
Export
This action will export the document.
- Click the Fx button next to the document you want to export.
- Click the icon to the left of Export.
- A pop-up window will appear where you select how you want the document exported:
- Metadata
- Native File
- Native File & PDF
- Native File & PDF w/ Metadata
Tag
This allows users to tag documents with a word or phrase for searching; this can then be used as search criteria in the global Content Search page.
- Below the user menu, click the Search button.
- At the Content Search page, locate the documents you want to tag using the search fields, then select the documents using the checkbox under the Actions column.
- After you select the documents you want to tab, click the Fx button above the document list.
- From the Fx menu, click the button next to Tag.
- In the pop-up window, select the tags you want to assign, then close the window.
Update Variable Name
Update the name of the current document using a Variable Name rule. This is used if the selected document(s) have a Variable Name rule assigned at the document type level.
- Click the Fx button next to the document you want to update the name for.
- Click the icon to the left of Variable Name.
- Click Yes to confirm.
Share
This allows a user to share documents to other people. You can set the amount of time a user has access to the document, as well.
- Click the Fx button next to the document you want to share.
- Click the icon to the left of Share.
- Select the User you want to share the document to.
- Click Send.
View Versions
This action will show you all versions of the document side-by-side for you to compare/contrast.
Show Versions
This action will display the version history of the document. This includes how many versions there are for the document, and which one is the current version users see when the document is opened in PinPoint. Simply click on the folder icon next to any version number to make it the current version.
View OCR
View the OCR text for the current document. This includes all text that can be used in an OCR/Content search from with the database.
- Click the Fx button next to the document you want to view the OCR for.
- Click the icon to the left of View OCR.
Workflow History
This action will display the workflow history for the document.
- Click the Fx button next to the document you want to view the workflow history for.
- Click the icon to the left of Workflow History.
The following Fx actions are found only in the Fx menu found on the File/Review Screen.
Forms
Access your forms library to enter and complete an existing form under the selected document type.
- Select the Doc Type the form is assigned to.
- Click the Fx button in the top-left of the screen.
- Click the icon to the left of Forms.
- Select the form you want to open.
Split
This action allows you to split a document into separate documents.
- Open the document you want to split.
- Click the Fx icon at the top.
- Click the icon to the left of Split.
- Input the Page or Range of Pages you would like to split, then click Add.
- Select the Cabinet, Folder and Sub-Divider for the split page(s) in the request.
- Select the Doc Type/Doc Tab.
- Input the Document Name.
- Under Action, selecting Copy will copy the pages from the original document and selecting Move will remove the pages from the original document.
- When ready, click Save.
- If additional pages need to be split, follow the steps above for each additional split request. Once all requests have been saved, click Submit when finished.
View Splits
This action will display the split history for the document.
